Create your own CocoaPods library in Swift

👋 Hey all,
During my tenure as a developer, I have come across various challenges and have had to find solutions to those challenges. One such challenge was to build a library that could be reused across multiple projects & publish it on the CocoaPods to be reusable by any of the developers. And that’s where the concept of creating custom pods came into play.

Table Of Contents
- Introduction
- Essential Prerequisites for Setting up your project
- Setting up the Pod Structure
- Publish Pod on CocoaPods
- Conclusion
In iOS development, CocoaPods is a widely used dependency manager that allows developers to easily integrate third-party libraries and frameworks into the projects. However, sometimes you may need to create your own custom libraries to be used across multiple projects.
In this blog, we will learn how to build a custom pod using a step-by-step approach in Swift for iOS development. We will cover everything from setting up the pod structure to publishing it on the CocoaPods. By the end of this guide, you will have a solid understanding of how to create and maintain your own custom pods.
Before we dive into the guide, let’s briefly talk about what custom pods are and why you might want to create one. Custom pods are the libraries that you create by yourself. These libraries can be used across multiple projects and allowing you to easily share. This can save your time and effort when working on new projects, and it can also help you to write more efficient code.
# Essential Prerequisites for Setting up your project
Before beginning development, it is essential to ensure that you have all the necessary tools installed and that they are up to date.

Ensure that the Prerequisites are up to date:
- A laptop running macOS, as CocoaPods is designed to work with macOS and iOS development.
- The latest version of Xcode, you can be download it from the Mac App Store.
- Ruby, the programming language that CocoaPods is built on. This should be pre-installed on macOS and you can also check by running the command:
ruby -v - The CocoaPods gem, which can be installed by running the command in the terminal:
sudo gem install cocoapods
# Setting up the Pod Structure
Are you ready to dive into the coding part? Let’s get started!

Step 1: Initiate Project
First, navigate to the desired directory where you want to create your custom Pod. Once you have selected the folder, open the terminal within that directory.
To create a new project for Pod creation, run the following command:
pod lib create
After that, proceed with configuring your Pod as necessary.
Step 2: Configure a template for your Unique Pod
Please respond to the following prompts (capitalization does not matter):
A. What platform do you want to use?? [ iOS / macOS ]iOS
B. What language do you want to use?? [ Swift / ObjC ]Swift
C. Would you like to include a demo application with your library? [ Yes / No ]Yes
D. Which testing frameworks will you use? [ Quick / None ]None
E. Would you like to do view based testing? [ Yes / No ]No
Once the setup is complete, it redirect to the project within XCode. If the directory is not already open, open it manually:
[PROJECT_DIRECTORY]/../[POD_NAME]/Example/[POD_NAME.xcworkspace]
Step 3: Setup Codebase on GitHub
Create a new repository on GitHub and link it to your existing codebase.
This will set up a GitHub repository with your existing code and allow you to continue to push and pull updates from the repository for future development.
Step 4: Revise the template version
Set the default pod template setting to the minimum version:
- iOS deployment target:
12.0 - Swift version:
Swift5 - Project Format:
Xcode 12-compatible
In addition, reflect this updated configuration in both Xcode and the relevant files.
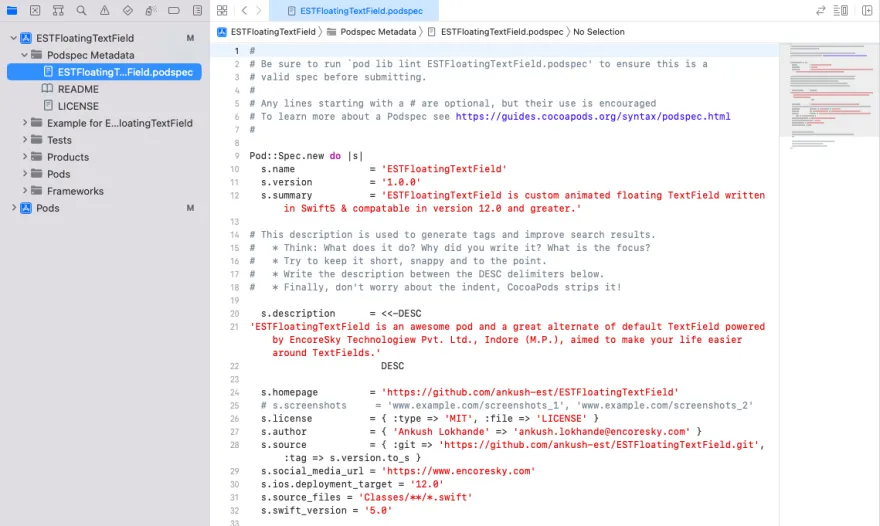
Step 5: Revise Podspec Metadata
					Revise the .podspec file within the Podspec Metadata section.

s.name  = <POD_NAME>

s.version = (example: 0.1.0)

# This short description is used to provide a brief summary of the functionality of the pod.

# * The name of the pod and the purpose it serves.

# * The main features and functionality provided by the pod.

# * The main platform(s) or technology(s) that the pod is intended to be used with.

# * Any dependencies or prerequisites that are required for the pod to function properly.

# * Any notable or unique features or capabilities of the pod that set it apart from similar libraries or frameworks.

s.summary =  <SHORT_DESCRIPTION_OF_POD>

# This description is used to generate tags and improve search results.

# * Think: What does it do? Why did you write it? What is the focus?

# * Try to keep it short, snappy and to the point.

# * Write the description between the DESC delimiters below.

# * Finally, don't worry about the indent, CocoaPods strips it!

s.description =<-DESC <LONG_DESCRIPTION_OF_POD>

DESC
s.homepage = <GITHUB_REPO_LINK>

# s.screenshots = <EXAMPLE_IMAGE>, <EXAMPLE_VIDEO>, <EXAMPLE_GIF>

s.license = { :type => 'MIT', :file => 'LICENSE' }

s.author = { <AUTHOR_NAME> => <AUTHOR_EMAIL_ADDRESS> }

s.source = { :git => <GITHUB_REPO_URL>, :tag => s.version.to_s }
s.social_media_url = <SOCIAL_MEDIA_LINK>, <OTHER_LINK>
s.ios.deployment_target = '12.0'
s.source_files = 'Classes/**/*.swift'
s.swift_version = '5.0'

s.source_files = 'Classes/**/*.swift'

s.swift_version = '5.0'
We specified a custom path for source files:
					s.source_files = 'Classes/**/*' thus, we must create Classes directory.
Locate the .podspec file in the Podspec Metadata group, as shown in the screenshot:
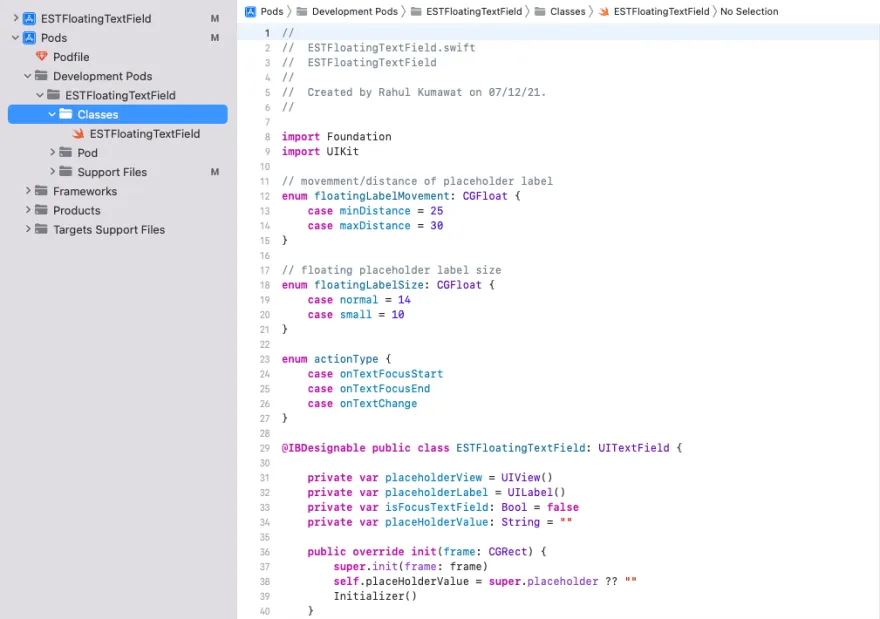
Step 6: Creating a Codebase Directory
Delete the ReplaceMe.swift file and Create Classes folder in the directory:
Pods project > Development Pods group > [POD_NAME] group
Create a file with the same name as the Pod within the Classes folder and use it to write custom code for the Pod.
example: .swift
You can also create multiple folders and files in order to write personalize code.
Refer to the screenshot for clarification:
Step 7: Create an example using Pod
To test the code of Pod, create an example by following the instructions in the folder reference:
[POD_NAME] project > Examples for [POD_NAME] group >
Please refer to the attached screenshot for further clarification:

Step 8: Push changes to the Git Repository
Commit the changes to the local Git repository and push them to the remote repository.
Your personalized pod can be reused across multiple projects, and can also be shared as open-source with the community.
# Publish Pod on CocoaPods
Now, We are at the stage where you can easily share your iOS development work with community by publishing personalize Pod to CocoaPods.

Publishing your own CocoaPod is fairly straight forward. Let’s get started!
Step 1: Getting setup with Trunk
To publish new or update Pod(libraries) to CocoaPods for public release you need a valid Trunk session on your current device. You can also publish your private library as well on the CocoaPods.
- Run command in the terminal by navigating to the project’s directory. Here is the example:
pod trunk register user@example.org 'Author Name' --description='Macbook Air'
Email and author name is the required parameter to run this command. Cocoa Pods personally recommend including a description with your session to give some context when you list your sessions later.
- Shortly you will get an email by Trunk to verify the connection between your Trunk account and the current computer. With the email open on your computer device, you are now able to access your Trunk account through the terminal. You can list your sessions by running the command:
pod trunk me
Trunk accounts do not have passwords, only per-computer session tokens.
Step 2: Validate Pod using lint
You can validate a pod using lint by running the command:
pod lib lint <POD_NAME>.podspec
This command will check the podspec file of the specified pod against the Cocoa Pods specs guideline and provide feedback on any error or issues that it finds on your pod. You can also skip the warnings and it only fails in the error case:
pod lib lint <POD_NAME>.podspec --allow-warnings
Once you have fixed issues or errors that are detected, you can then submit the pod for review.
Step 3: Create Release
You can create, release by the multiple ways:
- Using terminal:
					$ cd ~/code/Pods/NAME
$ edit NAME.podspec
# set the new version to 0.0.1
# set the new tag to 0.0.1
$ pod lib lint

$ git add -A && git commit -m "Release 0.0.1."
$ git tag '0.0.1'
$ git push --tags
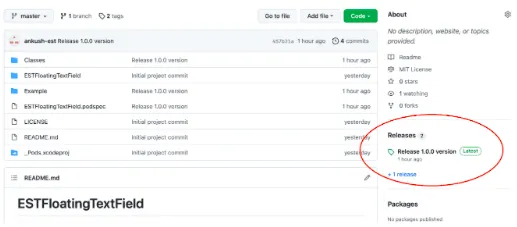
- Using GitHub web interface: Here are the steps:
- Go to the GitHub repository for your project.
- Click the “Releases” tab near the top of the page.
- Click the “Create a new release” button.
- In the “Tag version” field, enter a version number for your release (e.g. 1.0.0).
- In the “Release title” field, enter a name for your release (e.g. “Initial Release”).
- Optionally, you can write a description of the release in the “Description” field.
- Click the “Publish release” button.
Please respond to the following prompts (capitalization does not matter):
A. What platform do you want to use?? [ iOS / macOS ]iOS
B. What language do you want to use?? [ Swift / ObjC ]Swift
C. Would you like to include a demo application with your library? [ Yes / No ]Yes
D. Which testing frameworks will you use? [ Quick / None ]None
E. Would you like to do view based testing? [ Yes / No ]No
Once the setup is complete, it redirect to the project within XCode. If the directory is not already open, open it manually:
[PROJECT_DIRECTORY]/../[POD_NAME]/Example/[POD_NAME.xcworkspace]
Step 4: Deploying a Library
You must have a valid Trunk session to deploy a specific library. We have already discussed how to use Trunk.
Run the command to deploy library:
pod trunk push <POD_NAME>.podspec
It will deploy your Podspec to Trunk and make it publicly available to everyone. You can also deploy Podspecs to your own private specs repo with the following command
pod trunk push <POD_NAME>.podspec
After deploying specific pod, it generate a dedicated URL for your pod.
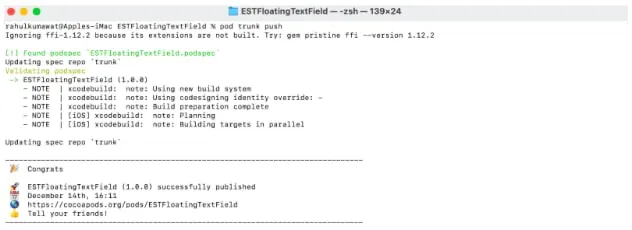
Congrats! 🎉
Your pod is published on the CocoaPods.

You can access your pod on CocoaPods using the provided link by Trunk. Anyone with link can add the pod to an existing Xcode project and use the feature across multiple projects.
Note: May be it take time up to a week or a month to appear your pod in the CocoaPods search results.
# Let’s Wrap!
With a little bit of effort, you can create a pod that becomes a valuable asset to the iOS developer community. By following the step-by-step guide outlined in this blog post, you should now have a solid understanding of how to create, test, and distribute your own custom pods. With this knowledge, you can easily create reusable components that can save you time and effort when developing iOS apps. You can also extend the functionality of your pod with the time and make it more reusable and functional.
Key Resources for in-depth exploration:
Here are a few additional tips to keep in mind when creating and maintaining your custom pod:
- Make sure to include clear and comprehensive examples of how to use the pod in your documentation.
- Regularly test the pod in different environments to ensure compatibility and fix any bugs.
- Always include versioning and release notes to keep track of the updates and changes made to the pod.
- Consider open-sourcing the pod to allow other developers to contribute and improve the code.
- Be responsive to issues and pull requests, and maintain an active presence in the community around your pod.
By following these tips, you can ensure that your custom pod is well-maintained and widely adopted by other developers.