Universal linking is a powerful feature in mobile applications that enables seamless navigation between a website and a corresponding mobile app. This documentation outlines the steps required to implement universal linking in your mobile application for both iOS and Android platforms. The provided real-life example demonstrates how users can transition between a website and a mobile app while maintaining a consistent user experience. Here’s a real-life example:
Imagine you have an app that helps users to find and book flights, hotels, and rental cars. You also have a website with similar functionality. With universal linking, you can create a seamless experience for users who click on links to your website while using their mobile devices.
Scenario:
- User A is planning a vacation and receives an email with a link to a specific hotel deal on the website.
- User A clicks on the link from their mobile device.
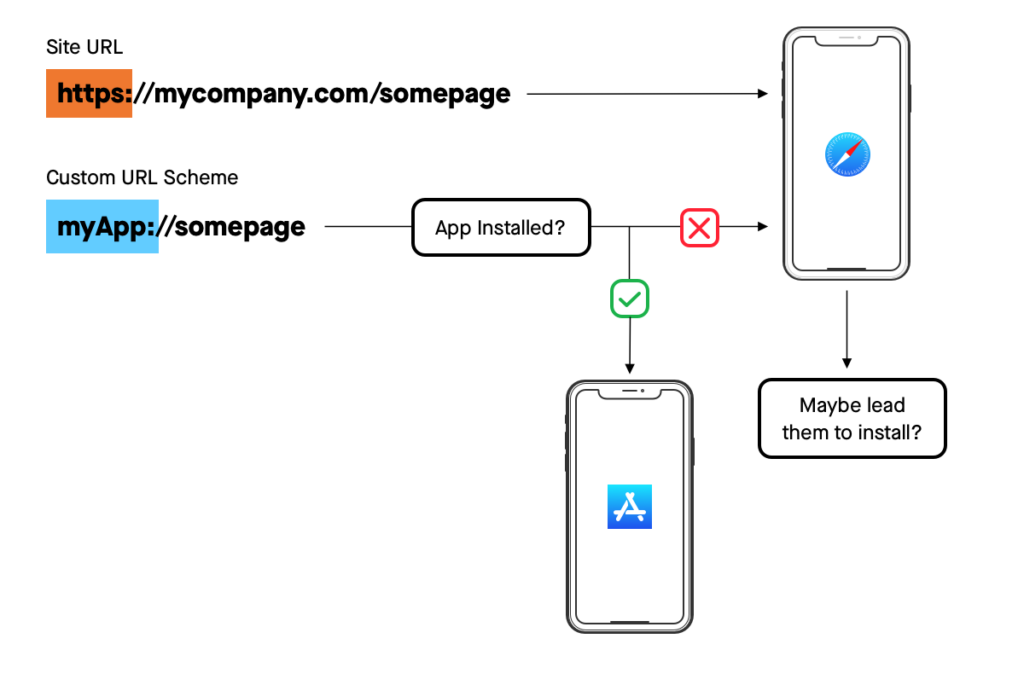
- Since you have an app that has implemented universal linking, the link is smart enough to detect whether the app is installed on the user’s device.
- If the app is installed, instead of opening the mobile browser, the link directs the user to the corresponding hotel deal within the app.
- If the app is not installed, the link will fall back to opening the hotel deal page on the website in the mobile browser.
This way, Universal Linking provides a seamless transition between the website and the app based on the user’s preferences and app installation status. Users who have the app installed can enjoy a more streamlined and potentially faster experience within the app, while users who don’t have the app can still access the content through the website.
To set up universal links on IOS, Here are a few steps:
1. Create an 'apple-app-site-association' File:
Create a JSON file named ‘apple-app-site-association’.
					{
  "applinks": {
      "details": [
           {
             "appIDs": [ "ABCDE12345.com.example.app", "ABCDE12345.com.example.app2" ],
             "components": [
               {
                  "#": "no_universal_links",
                  "exclude": true,
                  "comment": "Matches any URL with a fragment that equals no_universal_links and instructs the system not to open it as a universal link."
               },
               {
                  "/": "/buy/*",
                  "comment": "Matches any URL with a path that starts with /buy/."
               },
               {
                  "/": "/help/website/*",
                  "exclude": true,
                  "comment": "Matches any URL with a path that starts with /help/website/ and instructs the system not to open it as a universal link."
               },
               {
                  "/": "/help/*",
                  "?": { "articleNumber": "????" },
                  "comment": "Matches any URL with a path that starts with /help/ and that has a query item with name 'articleNumber' and a value of exactly four characters."
               }
             ]
           }
       ]
   },
   "webcredentials": {
      "apps": [ "ABCDE12345.com.example.app" ]
   },
2. Upload the File:
Upload the ‘apple-app-site-association’ file to your web server at the path
https://<fully qualified domain>/.well-known/apple-app-site-association.
So that when you request get ‘/apple-app-site-association’ it gives you the file.
For more details, refer to this link https://developer.apple.com/documentation/xcode/supporting-associated-domains
3. Validate the File:
Validate the file’s correctness using tools like
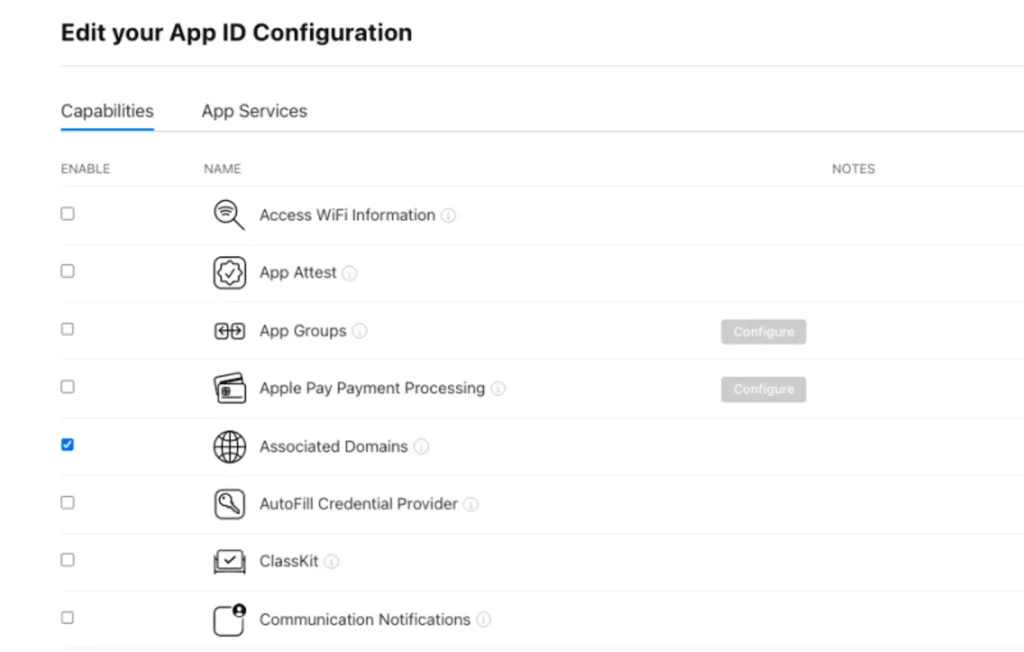
4. Update Associated Domains:
Enable the associated domains option in your app’s App ID on the Apple Developer portal and regenerate the provisioning profile.
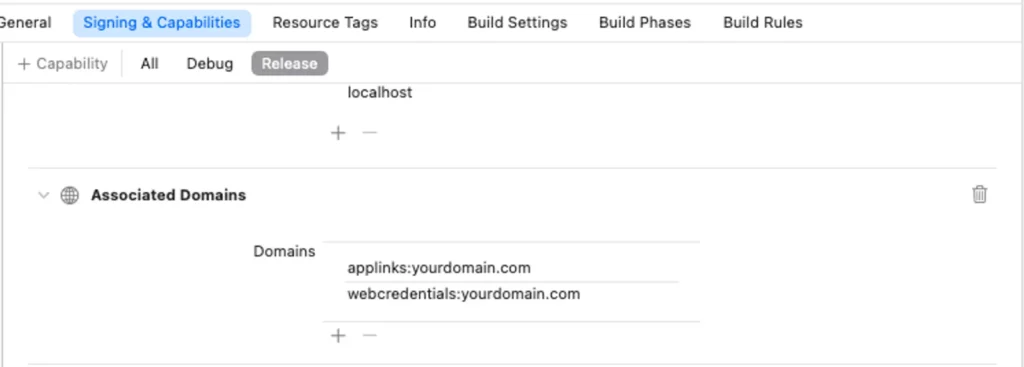
5. Configure Xcode:
In Xcode, add the associated domain to your project’s capabilities. This can be done by navigating to “Signing & Capabilities” and enabling the “Associated Domains” capability. Add the domain with the prefix ‘applinks’ and ‘webcredentials’.
6. Modify AppDelegate.m:
Add the following code to your AppDelegate.m to handle universal links:
					#import "RCTLinkingManager.h"
- (BOOL)application:(UIApplication *)application openURL:(NSURL *)url sourceApplication:(NSString *)sourceApplication annotation:(id)annotation
{
return [RCTLinkingManager application:application openURL:url sourceApplication:sourceApplication annotation:annotation];
}
- (BOOL)application:(UIApplication *)application continueUserActivity:(NSUserActivity *)userActivity restorationHandler:(void (^)(NSArray * _Nullable))restorationHandler
{
 return [RCTLinkingManager application:application continueUserActivity:userActivity restorationHandler:restorationHandler];
}
To setup universal links on Android, Here are few steps:
1. Create 'assetlinks.json' File:
Create an ‘assetlinks.json’ file containing your package name and SHA256 fingerprint.
					[{
  "relation": ["delegate_permission/common.handle_all_urls"],
  "target": {
    "namespace": "android_app",
    "package_name": "com.example.puppies.app",
    "sha256_cert_fingerprints":
    ["14:6D:E9:83:C5:73:06:50:D8:EE:B9:95:2F:34:FC:64:16:A0:83:42:E6:1D:BE:A8:8A:04:96:B2:3F:CF:44:E5"]
  }
  },
  {
  "relation": ["delegate_permission/common.handle_all_urls"],
  "target": {
    "namespace": "android_app",
    "package_name": "com.example.monkeys.app",
    "sha256_cert_fingerprints":
    ["14:6D:E9:83:C5:73:06:50:D8:EE:B9:95:2F:34:FC:64:16:A0:83:42:E6:1D:BE:A8:8A:04:96:B2:3F:CF:44:E5"]
  }
}]
You need to add the package name and need to generate sha256
package_name: The application_ID declared in the app’s build.gradle file.
sha256_cert_fingerprints: The SHA256 fingerprints of your app’s signing certificate.
Here is the command to generate the fingerprint via the Java keytool:
2. Upload the File:
Upload the ‘assetlinks.json’ file to your web server at the path
https://domain.name/.well-known/assetlinks.json.
For more details, refer to this link
https://developer.android.com/training/app-links/verify-android-applinks
3. Validate the File:
Validate the file’s correctness using tools like the
https://developers.google.com/digital-asset-links/tools/generator
4. Configure Intent Filters:
Add the following intent filter in your AndroidManifest.xml with your app’s package name, domain, and paths:
					<!-- Make sure you explicitly set android:autoVerify to "true". -->
<intent-filter android:autoVerify="true">
    <action android:name="android.intent.action.VIEW" />
    <category android:name="android.intent.category.DEFAULT" />
    <category android:name="android.intent.category.BROWSABLE" />

    <!-- If a user clicks on a shared link that uses the "http" scheme, your
         app should be able to delegate that traffic to "https". -->
    <data android:scheme="http" />
    <data android:scheme="https" />

    <!-- Include one or more domains that should be verified. -->
    <data
       android:host="....."
       android:pathPrefix="/path"
       android:scheme="https" />
</intent-filter>
Navigation and deep linking
In the majority of applications you develop, it’s common to have multiple screens. In such scenarios, you often need a way to transition or navigate between these screens. One approach you can take is known as deep linking. You can do this in React Native by directly using a function called Linking in JavaScript.
You can do this inside using these two methods:
If the app is already open:
Linking.addEventListener('url', ({url}) => {})
If the application is not already open and you want to get the initial URL, use this call:
Linking.getInitialURL()
Initially, I encountered a challenge where universal linking wasn’t functioning as expected. After an exhaustive review and analysis, I successfully identified the root cause of the issue. Please review the troubleshooting tips for the solution.
Troubleshooting Tips:
- Ensure that the SHA256 fingerprint in the configuration files is generated from the correct keystore used for app builds.
- Validate the correctness of the URLs, domains, and paths specified in the JSON files.
By following the provided steps, you can successfully implement universal linking in your mobile application, providing users with a seamless experience as they transition between your app and website.
External Links:
Universal Links: https://developer.apple.com/ios/universal-links/
Linking API in react native: https://reactnative.dev/docs/linking
deep linking, apple-app-site-association, ios deep linking, react native linking, react native universal links android, universal links android, react native universal links, react native universal links ios, react native for ios, react native linking, apple app site association linking in react


 (1)")